Anil Kumar,
Mechanical Engineering Department
Suresh Gyan Vihar University
Jaipur, India
akumar14916@gmail.com
Dr. Neeraj Kumar
Mechanical Engineering Department
Suresh Gyan Vihar University
Jaipur, India
neeraj.kumar1@mygyanvihar.com
Abstract—when we are using direct contact machining methods to machine the parts the surface roughness generated on the surface of machined parts play a very crucial role on the life-span and applications of that part. Many industries needs parts having very close tolerances and very good surface finish. A good surface finish ensues a minimal resistance between the two moving parts and wear between such moving parts is also minimal hence such parts have longer life and less unexpected failure rate during continuous operations. Other properties such as heat transmission, light reflection, holding lubricant are also affected due to quality of machined surface of a part. But in order to produce close tolerance and high surface finish the cost of production of such parts is also increased and as we have to adopt different types of special machining techniques to achieve desired specifications. The surface finish of machined parts is a very specialized area of precision measurement and in order to understand this area and to use that knowledge for production of precision machine parts in this paper all the details of surface finish and various methods to attain desired surface finish are explained in details.
Keywords— Surface finish, Machining of surface, Wear and tear of parts, Fatigue, fracture, friction etc.
I. Introduction
The relation between the roughness and smoothness of a component surface is called surface finish. The surface finish is the result of machining operation and tool used to machine the surface of the part. It creates surface irregularities during the machining operation and leave its own marks on the surface of machined part.
Good surface finish has many advantages such as
- Reduced friction
- Reduced wear & tear
- Increased machined speed
- Enhanced machine part life
- Enhanced flow of lubricant
- Enhanced aesthetic features
II. IMPORTANT TECHNICAL TERMS RELATED WITH SURFACE FINISH
There are many important terms which are used in the measurement of surface finish and one must have knowledge of these terms to study the surface finish of a component. Some of such important terms are detailed below:-
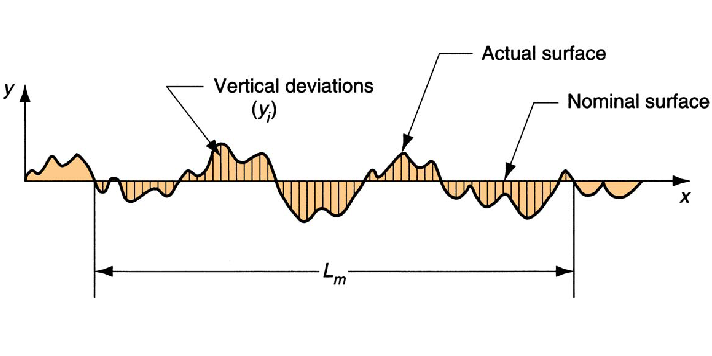
Roughness – the finely spaced smalldeviations from the nominal surface.
Ra = Roughness Arithmetic Mean Value
y= the vertical deviation from nominal surface
Lm=the specified distance
Nominal Surface – Intended surface of a part.
Actual surface – The surface obtained after completion of machining process on a part.
Cutoff length: It is a sampling distance along the surface.

Fig.(a)

Fig.(b)
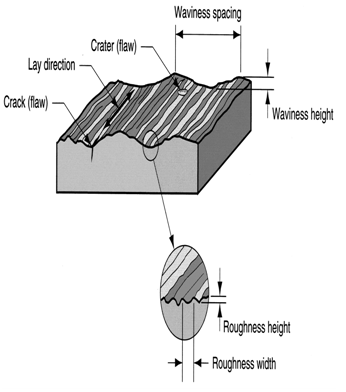
Figure 1(a) & (b) Surface Finishing Terms
Flaws : these regularities occurs at one place or at relatively frequent intervals on a surface such as hole, ridge , peak , crack etc. are called flaws.
Waviness: this is usually widely spaced component of surface texture and it is having wider spacing than the roughness width cut-off. The waviness may be produced due to factors such as work or machine deflection, chatter, vibrations, heat treatment strains etc.
Waviness height: It is expressed in terms of mm and is distance between the peaks to valley of waviness.
Waviness width: It is also expressed in mm and it is the distance between the two successive wave peaks or successive wave valleys.
Lay: It is predominant direction of the surface pattern. This is determined from the method of part production.
Unit of measurement: The general unit used to express surface finish is micron and 0.001mm is equal to one.
Symbols used to express Surface roughness : The details of Roughness Value (Ra) in µm , roughness Grade Number and roughness symbol is given below in table 1:-
Table No. 1 Surface Roughness value, Grades and Symbols
III. SURFACE FINISH CHECKING METHODS
A number of methods have been developed for checking or analyzing of surface irregularities. Depending upon the level of precision the operator or the quality supervisor can adopt the particular method from below given methods:-
- Comparison with standard specimens: A machined surface is compared with a standard finished specimen. The simplest method is to run the figure over the standard block and then over the “Lay” or “Ridges” of the machined surface.

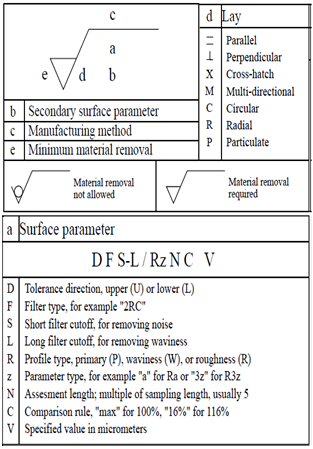
Figure 3. Surface Texture symbols
- Commercial sets of roughness comparison specimens: A number of standard surface specimens are available with the surface varying from the smoothest to the roughest, likely to be required. The finish of a machined surface is compared with those of the specimens, say on a comparator.
- Comparing finishes by projection method: This method makes use of a clear plastic film(fax-film) which, is fastened by the use of a solvent and is then pressed into the surface, thus transferring the unevenness of the film. The film is then mounted on a square frame. The surface pattern on the film is enlarged to 100 times or even more by use of a projector. In a comparison, a test specimen and a standard specimen can both be projected simultaneously.
- Tracer method: In this method a diamond or sapphire contact point is traced across the surface. The tracer point is traced across the surface, The tracer point is thus displaced while it moves over the minute valleys and hills of that particular surface which is being analyzed The movements of the point are magnified and are indicated either by a meter or some other type of instrument , or recorded graphically on a chart. This method gives a practical indication of the values of surface roughness. The profile-meter and the brush surface analyzer are the two tracer type instrument, which are commercially in use.
- Profilo-meter: This is an instrument which is used for measuring surface roughness. As a diamond tracer point moves slowly across the surface, surface irregularities are measured and averaged. The reading is directly given by a meter, which is graduated in microns.
- Brush Surface analyzer: This instrument gives a graphic ink-line and record of surface irregularities on a graduated chart. Theses irregularities are greatly magnified. The surface is traced by a stylus of which the point radius is 0.0125 mm. The movement of the stylus due to the surface irregularities are recorded in ink on a moving paper chart.
IV. SURFACE FINISHING METHODS AND THEIR APPLICATIONS
There are many types of surface finishing method which can be used according to the type of surface finish required on the particular components. The types of finishing method with level of surface finish that can be produced using these methods are detailed below:-
- LAPPING
It is an operation used to produce best finishing on the parts with the help of a lap and lapping compound. A lap is a metallic piece of any shape, flat or round, which is softer than the work-piece to be finished. The lap is charged with abrasive grains and brought in contact with the work. In the process of contact and relative movement against the surfaces, the finish on the surface is obtained. The details of various materials used in lapping process are given below:
- Material of lap: They are generally made-up of cast iron, soft steel, brass, copper and lead.
- Types of laps : Based on their applications the laps are classified in three types
- Flat
- Internal
- External
- Lapping Abrasives; Aluminum oxide, silicon carbide, boron carbide, emery, diamond dust.
- Charging of abrasives: The abrasive particles are pressed on the surface of lap. For this reason soft metal or material is chosen to enable the abrasive to get struck up on the lapping surface. After it is charged, it must be kept wet with kerosene.
- Lapping Allowance; The allowance for finishing process depends upon the size and condition of the surface.
- HONING
Honing is an operation of final finishing. This operation is carried out on a machine known as honing machine. Normally the honing operation is preferred for internal cylindrical surfaces but external surfaces also can be brought under this process. The process is carried out for the following reasons:
- To provide finish and produce a high grade of bore.
- To increase bore size.
- To rectify the trueness of bore which is distorted in heat treatment.
Details of tools and Equipment used in Honing
HONE: A hone is an abrasive stick made out of the material used for a grinding wheel. Aluminum oxide, Silicon carbide and diamond grits along with bonding material such as vitrified and resinoid bonds are used for the sticks. As a rule, hard sticks are used for the soft material and soft grade sticks are used for hard materials.
HONING MACHINE: Honing machines may be put into two general classes:
- Vertical Machines that avoid the sagging of work-pieces and tools
- Horizontal Machines that gives ready access and are better for manual operations and for longer pieces.
HONING OPERATIONS: The usual practice in a manual honing operation is to hold the work-piece and slide it back and forth over the tool rotating at the end of a spindle. A manual honing machine typically has a spindle in a headstock with pan beneath to collect the cutting fluid. The honing tool at the end of the spindle is expanded by means of a linkage to a foot pedal.
SPEED OF HONING TOOL: As a general rule the surface cutting speed is less for hard metals and more for soft metals. The rule applies to honing operation is done at 10-30 m/min.
HONING ALLOWANCE: Two types of surfaces are normally honed:
- Fine tuned
- Ground
Less honing allowance is needed for ground surfaces and more for fine-tuned surfaces.
COOLANT FOR HONING: Turpentine, Kerosene and thin soluble oil emulsions are best coolants.
- FROSTING
Surfaces which has been reduced to a required degree of flatness by the scraping methods are frequently finished by a process known as frosting. The operation is done by a scraper. There are three popular forms of frosting:
- The crescent form of frosting on flat surface
- Diamond frosting, which is produced on flat surfaces.
- A method whereby evenly spaced crescent shaped marks can be readily produced on flat surfaces.
- POLISHING
The polishing of metal is carried out by using wheels generally made of canvas, cotton, leather etc. on which abrasives are held by glue. Generally emery, synthetic alumina etc. abrasives are used.
- CHEMICAL FINISHING
This finishing can be done to many metals by converting the surface of the metal to a less corrodible and more decorative form by suitable mean. This method involves immersion in solution which produces a relatively inert compound such as an oxide or a tertiary phosphate on the metal surface.
- OXIDIZED FINISHING
This finishing is produced by silver or copper plating the base metal and then it is treated in sulphide solution to darken the deposit. The oxidized silver or copper finishing on steel is generally used on lighting fittings, name plates etc.
- PHOSPHATE PROCESS
This process is mainly applied to steel. It is based on manganese or zinc phosphate solution incorporating various accelerators, resulting in producing a phosphate film in ten minutes or less. The manganese phosphate process can provide a fairly thick coating suitable for impregnation with different kinds of oils, which may be of drying or non-drying type or with varnishes.
- ELECTROPLATING
It is one of the most important method of finishing, primarily to get hardness and durability of the deposits. It is applicable generally in engineering industries where the efficient protection of accurate parts of assemblies with the minimum dimensional change is of great importance. Various coatings are used i.e. copper, nickel, zinc, tin, chromium silver etc.
- GALVANISHING
It is used for the protection of steel sheets, tanks, rolled sections, steel windows, dustbins, buckets etc. For galvanizing, the steel is first cleaned in an alkali bath and then it is pickled directly in hydrochloric acid. After pickling it is sal ammonia fluxed and then dipped directly in to the molten zinc, which is contained in a low carbon steel tank maintained at 450 0C to 460 0C temperature. Automatic dipping plants are also available for galvanizing of a considerable variety of articles.
- PAINTING
Metal painting is done to provide both protection and decoration. Before painting the metal surface should be cleaned by completely removing oxidation , mill scale, rust, grease, dirt etc. which can be accomplished by abrasion(file, emery, grinding), pickeling. Flame cleaning (to remove mill scale, grease etc.) or by sand blasting. The method used should not only clean the metal but slightly etch it to provide a film bond between paint and the metal.
There are many more methods of surface finishing such as chromising, calorizing, cladding, sherardizing, metal spraying, lacquering, bluing, hot dipping, tin plating etc. which are used as per requirement and availability of resources.
The level of surface finish obtained by using different types of surface finishing processes is given in below table no 2:-
Table 2: Comparison of surface finish obtainable by different finishing processes
| S. No. | Finishing Process | Ra value (High-Low)
(µm)
|
| 1. | Grinding | 1.6-0.1 |
| 2. | Honing | 0.8-0.1 |
| 3. | Lapping | 0.4-0.05 |
| 4. | Die casting | 1.6-0.8 |
| 5. | Polishing | 0.4-0.1 |
| 6. | Electro-polishing | 0.4-0.1 |
| 7. | Electro-chemical Finishing | 3.2-0.2 |
| 8. | Boring / Turning | 6.3-0.4 |
| 9. | Forging | 12.5-3.2 |
| 10. | Sawing | 25-1.6 |
| 11. | Drilling | 6.3-1.6 |
| 12. | Reaming | 3.2-0.8 |
The above given table is showing maximum and minimum Ra values that can produced by each production methods. The Above mentioned high and low values are most common for each method of production. The value may vary under special processing conditions.
CONCLUSIONS
The measurement of surface finish means an overall texture of a surface which is characterized by the waviness, lay, surface roughness of the surface. The inclusion of all these three terms is also called as Surface Texture. Another term which is similar and also used to surface texture issurface topology. It can be concluded that surface finish of a component is very important for its performance and hence we should ensure that the component produced should have desired surface finish which will ensure that it will attain the expected lifespan and will not fail abruptly. The required surface finish is determined by the use and function of component. It can also be concluded that different manufacturing processes have different levels of surface finish attainment levels, therefore the selection of a manufacturing process should be done according to the requirement of the surface finish because manufacturing processes which can produce very high surface finish becomes costlier and will increase the cost of production of such components. Similarly there are many types of surface finish measurement methods that can be used to measure the actual surface finish of produced components. The selection of measuring method should suits the measurement parameter needs and should be less time consuming. It will ensure production of desired surface finish components economically.
References
[1] Engineering Metrology , 21st edition By Er. R. K. Jain, Khanna Publshers, New Delhi.
[2] Engineering Metrology And Measurements , By Raghavendra & Krishanmurthy, Oxford Higher Publication.
[3] Ganti, S. and Bhushan, B. (1995), Generalized fractal analysis and its applications to engineering surfaces, Wear, 180, 17-34.
[4] Nayak, P.R. (1973), Some aspects of surface roughness measurement, Wear, 26, 165-174.
[5] Anonymous (1985), Surface Texture (Surface Roughness, Waviness and Lay), ANSI/ASME B46.1, ASME, New York.
Matsumoto, Y., Hashimoto, F., Lahoti, G. Surface integrity generated by precision hard turning. In: Ann. CIRP 48/1 1999, p.59
